- Thread Author
- #1
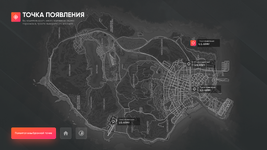
Map Spawn Selection Interface | React + Typescript Rage:MP
I leave to your attention the spawn selection interface.

I leave to your attention the spawn selection interface.

The interface is written using the stack: React TS, SaSS, ESlint
If your project does not use React, then it's okay. When you build, it will return index.html file to you, with an interface that you can import into the project.
The interface contains triggers and events, without a name. To connect, you need to go to the project and correct "EVENT:NAME" to the name of the event and/or trigger.
We will be grateful for the evaluation of the interface!
Project Developer - @dooj
Installing and running the project:
1. Installing the project from GitHub.
There are several options for installing the project.
Install via GitHub Desktop. To do this, you will need
Each of the methods is good in its own way, but this topic is not for that. You can read more about Git in the documentation or on YouTube videos.
- Copy repository link
- Open GitHub Desktop
- Log in via browser
- Add a repository via clone by link
- Installation through the console of your IDE or Windows terminal.
- Go to the directory you need (in which the project will be)
- Open the terminal
- Write the command: git clone
You must be registered for see links- Installation using a zip archive
- Go to
You must be registered for see links- Click on "
You must be registered for see links""- And click
You must be registered for see links(when you go to it, the file will start downloading)
2. Install project dependencies.
For the project to work, you must haveYou must be registered for see links
installed To install dependencies, go to the root of the project, open the terminal (or go to the root through the IDE) and write the command: npm install.
3. Launch of the project.
To start the project, go to the root of the project, open the terminal (or go to the root through the IDE) and write the command: npm start.
4. Project build.
To build the project, go to the root of the project, open the terminal (or go to the root through the IDE) and write the command: npm run build.
When finished, at the root, you will have a build folder with a index.html file and folders. We can use these files to import into our project.
Detailed description of the project structure:
1. Installing additional spawn
points To set an additional point, we go to src/configs/SpawnPoints.json. By opening the file, we can find an array with the spawn points on the map.
To add a new point, create and add another object of the view:
JavaScript:
{ "trigger": "trigger", "name": "Trigger", "position": { "x": 0, "y": 0 } }"trigger" - is responsible for the name of the element that will be sent by the trigger, when you click "spawn in the selected place"
"name" - is responsible for displaying the name on the map, in the
"position" interface - has another object, with X and Y elements. The X is for the left side of the X axis, and the Y is for the top side of the Y axis.
SPOILER: "X" AND "Y"
AXES After adding the spawn point, we need to open the file at: src/Spawn.tsx.
Then find the line:
JavaScript:
export type ISpawns = 'ballas' | 'gov' | 'army' | 'sheriff' | 'airport' | 'house' | 'last:position'; // Update Points To src/config/SpawnPoints.jsonHere we enter the specified trigger that we created when adding the point. All triggers must be separated by the "|" character.
2. Event and trigger
management The project has 1 main rage event and 1 main rage trigger.
Event
Event is located at: src/Spawn.tsx.
The event is responsible for receiving and parsing data received through the client, from the server. Takes this form:
JavaScript:
// ISpawns = 'ballas' | 'gov' | 'army' | 'sheriff' | 'airport' | 'house' | 'last:position'; - триггеры точек

{ house: boolean lastPosition: boolean organization?: ISpawns }
Let's analyze each element of the object.
1. House - is responsible for whether the character has a house. If there is no house - accordingly, the display of the spawn point near the house will not be. Accepts true or false
2. lastPosition - responds to giving the character the opportunity to spawn at the last exit location. Accepts true or false
3. organization - is responsible for displaying the spawn point on the map by trigger. Conventionally, we added the vagos trigger to the points and set it on the map by coordinates. To display this particular available point, we need to send a trigger for this point to the organization to indicate that the character has a spawn available there. Accepts undefined or trigger name.
The entire event accepts a JSON.stringify() string sent via browser.call(EVENT:NAME, data).
The name of the event is written manually - in the place of 'EVENT:NAME'
Trigger, the Trigger
is located in the path: src/rage/triggers.ts.
The rage trigger sends data about the spawn information (spawn point trigger). At the moment, by clicking "Spawn at the selected point" with the selected point, you will automatically receive a trigger, which is specified in the config.
For the house and spawn location, the triggers are sent: "house" and "lastosition".
On the client side, we handle this accordingly:
JavaScript:
const positions = { ballas: new mp.Vector3(0, 0, 0); }

mp.events.add("EVENT:NAME", (spawn: 'ballas' | 'gov' | 'army' | 'sheriff' | 'airport' | 'house' | 'last:position') => { switch (spawn) { case 'ballas': player.position = ballas; break; } })|
You must be registered for see links
1 |
You must be registered for see links
2 |